
Want to learn ‘how to setup Cricut Explore Air 2‘ in easy steps? This guide has your back! Whether you are a newbie or a hobbyist, I have curated this guide for everyone who wants to dive into crafting from scratch. When I started setting up my machine for the first time, it took me less than 10 minutes. Since I was a beginner, I followed every step carefully to avoid any mistakes. Although 10 minutes sounds more, I can make it possible in less than that.
In this post, I will setup my Cricut Explore model on my Windows computer. So, if you plan to set it up on your desktop, join me on my crafting journey. During setup, ensure your computer and machine are properly placed on the flat surface and close enough to connect it wirelessly.
Step 1: Check Minimum System Requirements
Okay, we will start by checking our Windows system’s compatibility. Once we finish it, we will move to the next steps to learn how to setup Cricut Explore Air 2. In other words, I will show how to download and install the Design Space app. Without this software, the setup is incomplete. Take a look at the below specs:
- Supported OS: Windows 10 or later
- Processor Requirement: Intel Dual-Core or comparable AMD
- RAM: 4GB
- Available Disk Space: 2 GB
- Connection Needs: USB or Bluetooth
Step 2: Download the Cricut Design Space App
Checked all the specifications for Windows computer? That is a must; otherwise, an incompatible device cannot run the software properly. So, proceed ahead only when you have a compatible device. I have mentioned the steps below; follow them step-by-step for how to setup Cricut Explore Air 2 procedure:
- Power on your Windows 10 PC.
- Launch a web browser and go to the search bar.
- After that, you have to visit the design.cricut.com.
- Now, you will move to the next screen and tick a squared box to accept the Terms of Use and Privacy.
- Afterward, tap on the Download tab to download the file to your Downloads folder.

- Once the file is downloaded, you need to open it.

- To open it, click on the Download icon on the upper ribbon bar of your browser.
- Otherwise, you can go to your File Explorer and click on the Downloads folder.

- Double-click on the downloaded file if you open it from File Explorer.
- Once it is opened, you will see a Cricut Design Space Setup dialogue box.
- It displays the status of the software installation.
- You will need to wait till it completes the process.
Step 3: Create a Cricut Account ID
After downloading the Cricut Design Space App, you have to open it and move on to the next step, i.e., creating an account. Let’s see how to create it by following the steps given below:
Note: If you have created your account already, skip this step.
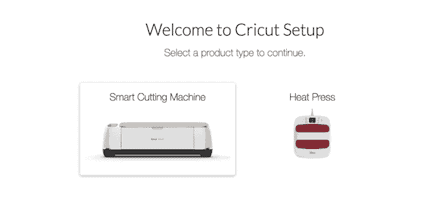
- Visit this URL – design.cricut.com on your browser.
- On the next screen, you have to select the Smart Cutting Machine.
- Then, select the checkbox and accept Cricut’s Terms of Use and Privacy Policy.
- Since you have already downloaded the app, select “Open App” now.
- It will launch the app that you downloaded.
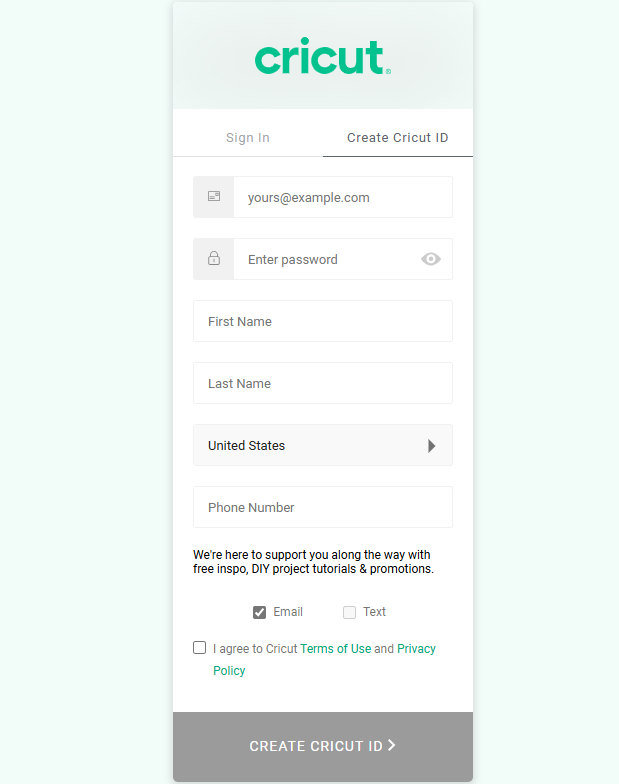
- Next, click on the Sign In option.
- On the Next screen, click on the Create Cricut ID.
- Then, fill in all the requisite details, accept the T&C, and proceed.
Step 4: Connect Cricut to Your PC Wirelessly
Now, you have created your Cricut ID. In the next step, I will teach you how to setup Cricut Explore Air 2 Bluetooth setup on Windows. By now, you might have followed all the steps explained above. Once done, let’s start following the steps provided below:
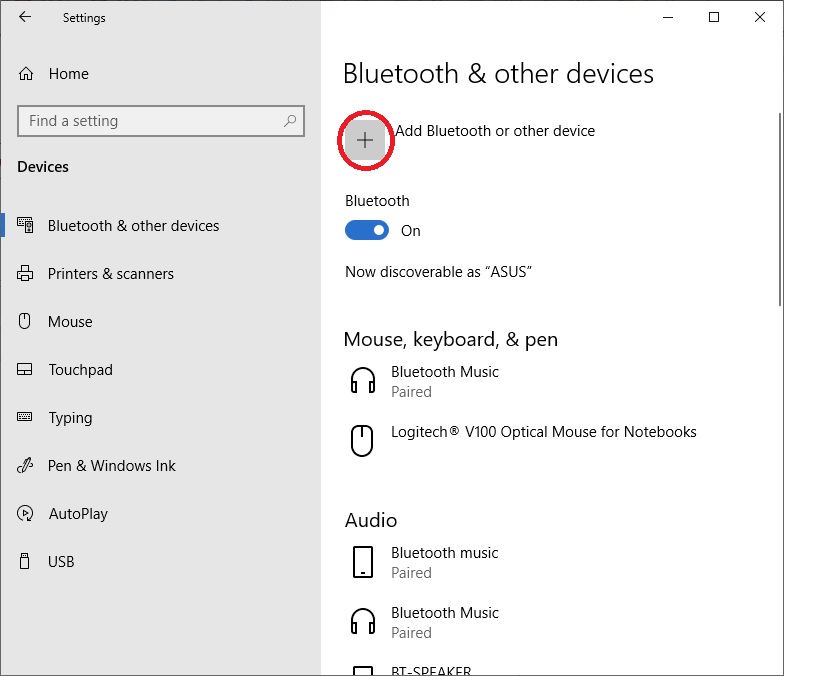
- Start your desktop and go to the Settings tab.
- On the settings, look for the Bluetooth option and turn it on.
- After that, click on the option Add Bluetooth or other device to add the machine.
- Next, add the machine and complete the pairing.
- After the connection, you can start following the rest of the steps on your desktops to complete the setup.
Finally, you have completed the 4 steps to learn how to setup Cricut Explore Air 2. Enjoy your crafting journey without a hitch now!